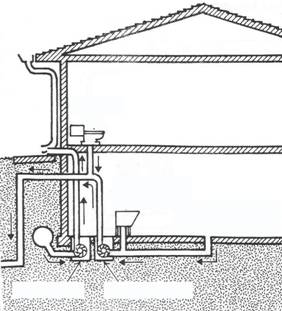
As shown in basement plumbing, the sanitary sewer line drains toilet waste, laundry tubs, and (sometimes) the basement floor drain to the sanitary sewer main in the street. Clean stormwater and groundwater is handled by downspouts, footing drains, and sump pumps.
Often basement flooding is caused by these two sewer systems being interconnected. Some houses have the downspouts, footing drain, and/or the sump pump connected to the sanitary sewer service. During a heavy rain, stormwater enters the sanitary sewers, causing backups into one house and overloading the main lines, contributing to backups in other houses.
Don’t cause your own flood! Keep your sewer lines clear!
- Keep roots from trees and shrubs out with root killer.
- Make sure your yard clean-out vent will keep debris out.
- Don’t pour dangerous liquids down the drain (motor oil, paint, pesticides, poisons, epoxies, etc.).
- Don’t pour grease, fat or cooking oil down the drain (they solidify later).
- Don’t flush large solids, such as diapers, down the toilet.
Sewer backups can also be caused by events not related to storms or flooding. Individual service lines can be plugged by grease, waste, tree roots, breaks in the pipe, or saturated ground. Proper maintenance, like pouring tree root killer down the toilet or floor drain can prevent most of these problems.
The sewer mains can also be plugged by the same causes, or by vandalism or illegal dumping in manholes. These problems can be fixed by the owner or the Village, depending on where the stoppage occurs.
There are four ways to stop sewer backup that occurs when the sewer main is overloaded and backs up through the sanitary service line into the house: floor drain plug, floor drain standpipe, overhead sewer, and backup valve. Each of these measures work for buildings with basements or below-grade floors.
Floor Drain Plug
The simplest way to stop sewer backup is to plug the opening where it first occurs (see the basement plumbing graphic). This is at the floor drain, the sanitary sewer system’s lowest opening in the house. Two inexpensive measures can be used: a plug or a standpipe. Both can be purchased at local hardware stores and are easy for the handyperson to install.
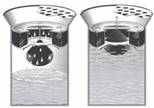
Floor drain float plug
The flood drain plug stops water from flowing in either direction. Therefore, if the laundry tub overflows or other spillage occurs, it will stay in the basement unless the plug is removed. Because of this, it may be best to leave the plug out under normal circumstances and put it in place only during heavy rains.
One variation is a plug with a float. It allows water to drain out of the basement (see illustration, left side). When the sewer backs up, the float rises and plugs the drain (see illustration, right side). A float plug permanently installed will not interfere with the floor drain’s normal operation.
Precautions: A plug left in the floor drain may contribute to a wet basement if water from a laundry tub spill or a leaky pipe cannot drain out. Float plugs are known to have been jammed open by a small amount of debris. A plug does not tell you if there is a problem in your sewer service line. If the plug is not tight enough, pressure can eject it. Therefore, a plug is not recommended for flood depths greater than one foot.
Standpipe
A standpipe is an inexpensive alternative to a floor drain plug. When the sewer backs up, the water moves up the pipe. If properly installed, water pressure cannot build up to blow a standpipe out of the floor drain. The system works unless the backup is so deep that it goes over the top of the pipe.
Precautions: Neither the plug or standpipe stops backup from coming out of the next lower opening, like a laundry tub or basement toilet. Sealing the base of the toilet to the floor will protect you until the water backs up higher than the top of the bowl.
Because water pressure depends on the height of water in the pipes, a standpipe does not reduce the pressure in the pipes (or under the floor, if the pipes leak). Because the pressure under the floor is the same with a standpipe or a plug, standpipes and plugs are only recommended for flood depths of one foot or less and for buildings with cast iron sewer lines underneath the floor.
Overhead Sewer
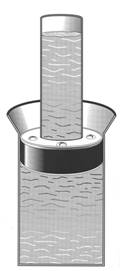
Overhead sewer arrangement
An overhead sewer is generally viewed as the most effective sewer backup protection measure. It acts like a standpipe but without the shortcomings. A sump is installed under the basement floor to intercept sewage flowing from basement fixtures and the basement floor drain. An ejector pump in the sump pushes sewage up above the flood level. From there it can drain by gravity into the sewer service line. Plumbing fixtures on the first floor continue to drain by gravity to the service line.
Unless the house is subject to overbank flooding, it is unlikely that the sewers will back up above ground level. If water does go higher, a check valve in the pipe from the ejector pump keeps it in the pipes. Backed up sewage is enclosed in the sewer pipes and doesn’t overflow laundry tubs or basement toilets.
Although more dependable than a standpipe, an overhead sewer is more expensive. A plumbing contractor must reconstruct the pipes in the basement and install the ejector pump. It can cost $3,000 to $7,000.
Precautions: The ejector pump requires electricity to work, so battery backups are recommended. The basement is disrupted during construction and the ejector pump needs periodic maintenance. This work requires a licensed plumber and a permit from the Planning and Development Department.
Sewer Backup Valve
A backup valve stops the water in the sewer pipes. While not as foolproof as an overhead sewer, installation is less disruptive to the basement.

Older versions of this approach were located in the basement floor and relied on gravity to close the valve. If debris got caught in the flapper, the valve did not close tight. Because of its unreliability, valves were discouraged and even prohibited in some communities. Today’s systems are more secure. They include installing two valves in line, using better, more watertight materials, or counterweights that keep the valve open all the time so debris won’t catch and clog it.
Larger valve systems are usually installed in a manhole in the yard, well away from the basement wall, so there is less disruption during construction and no concerns over breaking the pipes under the basement floor. The cost of this type of backup valve is comparable to the cost of an overhead sewer, in the $4,000 to $6,000 range.
Precautions: The ejector pump and the valve require maintenance. This work requires a licensed plumber and a permit from the Planning and Development Department.
Disclaimer:
This information is designed to give you an overview of steps that can be taken to protect a property from damage from the type of surface water flooding and sewer backup that faces South Holland. The information provided is based on careful research and input from experienced professionals. You must assume responsibility for adapting this information to fit your conditions. This guide is not intended to replace the advice and guidance of an experienced professional who is able to examine a building and assess the needs of the particular situation.
Barriers
Barriers keep surface floodwaters from reaching a building. A barrier can be built of dirt or soil (“berm”) or concrete or steel (“floodwall”). The standard design for earthen berms is three horizontal feet on each side for each vertical foot (3:1 slope). As a result, you should plan on needing an area six feet wide (at a minimum) for each foot in height.
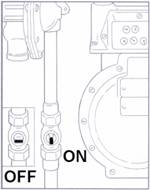
To turn off the gas:
1. There is a valve next to the gas meter. If it is parallel to the pipe, the gas is on.
2. Use pliers or a wrench and turn it 90 degrees.
3. To be sure the gas is off, write down the numbers on all the dials on the meter.
4. Check the dials at least 5 minutes later. If the numbers have changed, the valve is not closed.
Depending on how porous your ground is, if floodwaters will stay up for more than an hour or two, your barrier will need to handle leaks, seepage of water underneath, and rainwater that falls inside the perimeter. You will need a sump and/or drain to collect the internal groundwater and surface water. A pump and pipe is also needed to pump the internal drainage over the barrier.
A berm or floodwall should be as far from the building as possible to reduce the threat of seepage and hydrostatic pressure. However, it must not interfere with drainage along your property line. Where the house is close to the property line, you may need place the berm next to the wall, like a basement protection berm.
Don’t forget: a permit is needed for filling or regrading a yard. There may be restrictions on bringing fill onto your site if it blocks the flow of flooding or displaces floodwater storage areas. For example, state regulations require that barriers located within the regulatory floodway be within ten feet of the structure.
Precautions: Barriers can only be built so high. They can be overtopped by a flood higher than expected. Earthen berms are susceptible to erosion from rain and floodwaters if they are not properly sloped and covered with grass and maintained. Don’t plant trees or shrubs on a berm (their roots can cause leaks). Barriers can settle over time, lowering their protection levels.
Some barriers have openings for driveways and sidewalks. Closing these openings is dependent on someone being available and strong enough to put the closure in place. You also need to account for water in the sewer lines that may back up under the barrier and flood inside your house.
Dry Floodproofing
This term covers several techniques for sealing up a building to ensure that floodwaters cannot get inside it. For dry floodproofing, all areas below the flood protection level are made watertight. Walls are coated with waterproofing compounds or plastic sheeting. Openings (doors, windows, and vents) are closed, either permanently, with removable shields, or with sandbags. Many dry floodproofed buildings do not look any different from those that have not been modified.
Dry floodproofing is only appropriate for buildings on concrete slab floors (without basements) and with no cracks. To ensure that the slab is watertight and sound, an engineering analysis is recommended.
The maximum flood protection level is two feet above the slab. The walls and slab floor were not built to withstand the type of pressures exerted by deeper water. It is smarter to let deep water into your house than to risk losing your walls or floor.
Precautions: It is very tempting for the owner of a dry floodproofed building to try to keep the flood out if floodwaters get deeper than two or three feet. This can result in collapsed walls, buckled floors, and danger to the occupants.
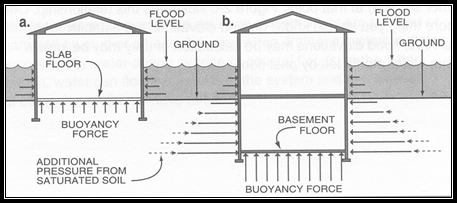
It is difficult to waterproof a crawl space to protect it from underseepage. Basements should not be dry floodproofed to protect them from surface flooding because of the water pressure on the walls and floors. See the basement protection berm for an alternative approach.
Many commercial waterproofing compounds are made to protect wood from rain, but they will not withstand the pressures of standing water. Some deteriorate over time, so check with the supplier to be sure the waterproofing compound is appropriate for sealing your basement walls from water. Installing closures and seals over doors and windows requires enough warning and having someone at the building who knows what to do.
Wet Floodproofing

This wet floodproofed garage has bare concrete,
unfinished drywall (for fire protection) and an elevated water heater.
Wet floodproofing means letting the water in and removing everything that could be damaged by a flood. There are several ways to modify a building so that floodwaters are allowed inside, but minimal damage is done to the building and its contents. These techniques range from moving a few valuable items to rebuilding the floodprone area.
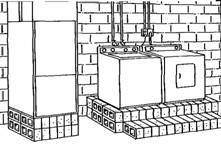
In the latter case, structural components below the flood level are replaced with materials that are not subject to water damage. For example, concrete block walls are used instead of wooden studs and gypsum wallboard. The furnace, water heater, and laundry facilities are permanently relocated to a higher floor. Another approach is to raise these items on blocks or platforms where the flooding is not deep (see photo).
Wet floodproofing is not feasible for one-story houses because the flooded areas are the living areas. However, many people wet floodproof their basements, garages, and accessory buildings simply by relocating all hard-to-move valuables, such as heavy furniture and electrical outlets. Light or moveable items, like lawn furniture and bicycles, can be moved if there is enough warning. Fuse and electric breaker boxes should be located so you can safely turn the power off to the circuits serving floodprone areas.
Even a minor wet floodproofing project
will reduce flood losses to a home.
Another approach is to wet floodproof a crawlspace. If your crawlspace has a furnace in it or is used for storage, these items could be moved to the first or second floor. Vents should be placed on the foundation walls to ensure that floodwaters can get into the crawlspace to equalize water pressure.
Wet floodproofing has one advantage over the other approaches: no matter how little you do, you will reduce your potential for damage. Thousands of dollars in damage can be prevented by simply moving furniture and electrical appliances out of a basement.
Precautions: Moving contents is dependent on adequate warning and the presence of someone who knows what to do. Flooding a basement or garage where there is electricity, paint, gasoline, pesticides, or other hazardous materials creates a safety hazard. There will still be a need for cleanup, with its accompanying health problems.
Moving water lines, furnaces, or electric service boxes requires a permit from the Planning and Development Department.